Monday 12 December 2011

Insert and Update image field in SQL Server 2008/2005

Insert and Update image field in SQL Server 2008/2005


This article is about how to insert and update image or varbinary field from within SQL Server itself.

Before we move further, If you wish to look at the article with C# script, please have a look at:


Ok, now let us move ahead with our script in SQL Server itself.

--create table for demonstration
create table emps
(
      name varchar(50),
      dept varchar(10),
      empImg image
)
GO

--insert statement with single_blob to upload image to SQL Server
INSERT INTO emps ([Name],dept,empImg)
SELECT 'Ritesh','MIS',
(select * FROM OPENROWSET(BULK 'C:\Ritesh.JPG', SINGLE_BLOB) AS img)
GO

--check the inserted data
select * from emps
GO

--update your table, along with image also.
update emps
set empImg=(select * FROM OPENROWSET(BULK 'C:\Ritesh1.JPG', SINGLE_BLOB) AS img), dept='IT'
where name='Ritesh'
GO

--check the data whether it has been updated
select * from emps
go


Tuesday 31 May 2011

Repeat Tablix Row Header on each page (SSRS 2008)

Getting SSRS 2008 to repeat the Tablix header is not a straight forward setting and requires some additional steps to do so.
This used to be very simple thing till SSRS 2005, there basically we just used to right click on the Table, select the check box “Repeat header rows on each page” and we are done.


We need to take some additional steps to make this working in SSRS 2008 and the primary reason is the Table structure has been changed in SSRS 2008. Now we have “Tablix” in place of “Table” which is the combination of Table and Matrix.
Here are the steps needed to make sure Tablix Row header is shown is each page.
1. Even though the Tablix has Row/Column header properties in the property pane but this does not work especially when the row grouping is used in Tablix.


2. In order to make sure that the Tablix row header is repeated in each page, we need to go the Advance Mode settings of Tablix.
In the bottom of Report Designer-->Under Groupng Pane-->Column Group-->Click on Advance Mode


3. In the Row Groups pane, click the static member of the row you need to repeat.
4. When we select the Static Member, the corresponding cell in the Tablix will be selected. If this confirms the cell which needs to be repeated, go to the properties of this Static Member.
5. Set the KeepWithGroup property
a) For a Static row that is above a group, select “After
b) For a Static row that is below the group, select “Before” if the Static Row is below the Group.


6. The last thing would be to set the RepeatOnNewPage property “True


Friday 27 May 2011

SSRS: Use multiple fonts, sizes and colors in a single text box.

SSRS: Use multiple fonts, sizes and colors in a single text box.


Over the past few years I have seen a lot of forum posts from people looking to make a single word bolder or a different color to highlight something inside a single text box.  Most efforts in this area have resulted in frustration and work arounds.  Starting with SSRS 2008 there something I consider a little known feature that brings most of this frustration to an end.  The feature is called Create Placeholder, and it allows many new formatting options for a single textbox.  The first time I went looking for it, I couldn’t even find it, but I kept poking around and eventually realized my simple error. 
Start with any textbox on a report.  It can be a standalone textbox or part of a tablix.  The mistake I initially made was right clicking ON the textbox as though I was going to create an expression or modify the textbox properties.  What you need to do is click IN the textbox as though you are going to type directly into the textbox.  Then right click and you will see an option on the menu for Create Placeholder.  (This is a natural spot for a picture.  Sorry I can’t seem to grab the popup menu with a screen capture.) 
The dialog box that opens is very much like the textbox dialog, minus a few items that logically belong to the outer textbox object: Border, Fill, Visibility, and Sort.  All the existing options are remarkably similar to the Textbox dialog box with only a few differences.  One of the more interesting differences, Markup Type, is right on the General tab.  It allows you to put HTML style and formatting tags in your placeholder by choosing HTML.  If you choose the None option, anything you put in the value will be interpreted as plain text only.  However all your normal number, and font options remain.
Create Placeholder Dialog General tab

The Alignment tab is also pared back somewhat for this new object.
Alignment tab
Let’s try a few tweaks in a textbox.  Start by typing some text.
just text
Now right click next to that text and choose Create Placeholder and try a few font options.  Be sure to give your Placeholder object a Label and a Value as well as setting up the options.  You can also put multiple Placeholder objects in a single Textbox. 
Placeholders in Design Mode
As you can see in my sample the text you type in the Textbox can be mixed with Placeholders.  In Design Mode, the placeholders show their label names.  In preview mode the Placeholders show their values.
Preview Placeholders
This kind of formatting within a textbox opens up a lot of ways to enhance your reports in both very obvious ways and very subtle ways.  One thing is for sure, when used properly this object can increase the readability and impact of your reports. Using a Placeholder object can help you draw the eye to words and numbers you want to emphasize.  I think you can even use this to create a more dashboard like feel to some really basic text reports.
I hope you find this to be a useful tip.  Thanks for reading.

Tuesday 10 May 2011

How to create Dynamic Txt Flat file as destination in SSIS

How to create Dynamic Txt Flat file as destination in SSIS

1. Create a new flat file connection through Connection Manager. 
2. Once created then select the properties...
3. Click on ... option in Expressions
4. Select Property as ConnectionString 
5. Write done the Expression @[User::dest_path] + "FileName" + RIGHT("0" + (DT_STR,4,1252)MONTH( DATEADD( "dd", -1, getdate())),2)+RIGHT("0" + (DT_STR,4,1252)DAY( DATEADD( "dd", 0, getdate() )),2)+ (DT_STR,4,1252)YEAR( DATEADD( "dd", -1, getdate() ))+ ".txt" NOTE: @[User::dest_path] is a variable where we have mentioned the location (URL) so it will append this file in the same path.

How to read a Flat File with data delimited by any wild card character like ‘#’, ‘$’ (SSIS)

Requirement:
Generally we deal with Flat Files which are comma (,) separated i.e. CSV files. And in SSIS by making use of ‘Flat File Source’ component we can read them very easily. These files can contain results/data from various sources like IBM, Mainframe, SAP etc. They may also be manually created or generated through some custom applications. And thus due to some specific requirements or limitations; they may have data which is not comma (,), bar (|), semi colon (;) etc delimited. These are among the few possible options available in Flat File connection manager used while reading the Flat Files in SSIS.
Apart from that there may be the requirement of having data containing comma (,) in their values itself. And thus we cannot just replace all the delimiters like dollar or # with a comma to have a comma separated file.
So to make it possible & read the records from a Flat File which can have any known separator for its column values, we need to do some kind of exercise explained below.
 Solution:
Since we don’t have any inbuilt option to select ‘#’ or ‘$’ etc as a delimiter for Flat File in connection manager, we would take the whole line/record into one column and then would split out all the values as per the present delimiter, using a Script Component.
Let’s take an example:
We have a .txt (Flat) file (say InputFile.txt) with three columns A, B and C. These headers are comma separated but the values under these columns are ‘#’ delimited.
Data into the file:
A,B,C
100#200#300
500#600#700
 Steps for the SSIS Package:
  1. Take a Data Flow Task (DFT).
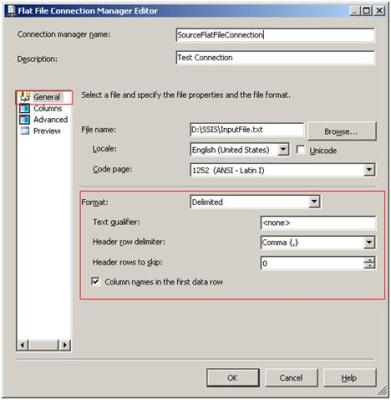
  2. On the data flow tab, Drag one ‘Flat File Source’, edit it and click on ‘Flat File Connection Manager -> New’.
  • Name it as ‘SourceFileConnectionManager’.
  • Select the ‘Inputfile.txt’ in the File Name column by browsing the file.
  • Select Format as ‘delimited’.
  • Select ‘Header row delimiter’ as ‘Comma {,}’.
  • Select the check box for ‘Column names in the first row’.
1
  

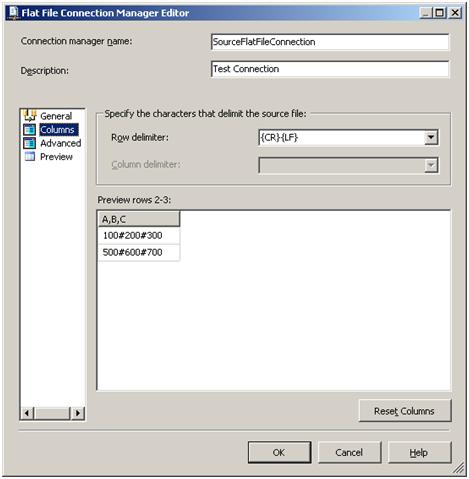
  • Go to Column tab of this connection manager.
  • Select ‘{CR} {LF}’ as Row delimiter.
Screen would look like as:
2


As you can see all the data is now coming into a single column named ‘A,B,C’. 
  • Click OK.
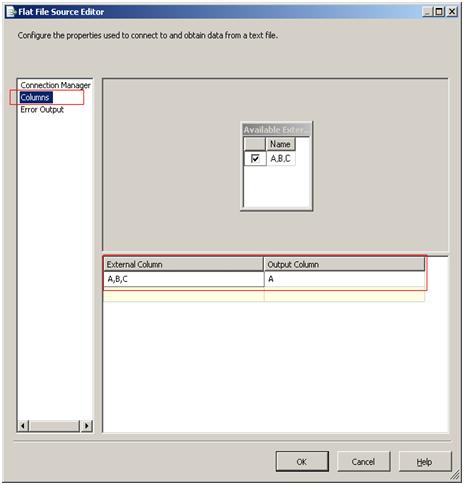
  • Go to ‘Columns’ tab of the Flat File Source.
  • Rename the Output column as ‘A’.
3

 Click Ok.
 3. Drag a Script Component & select to use it as a Transformation while adding it.
  • Point the output of Flat File Source to this script component.
  • Edit its properties and select “A” as an input column there.
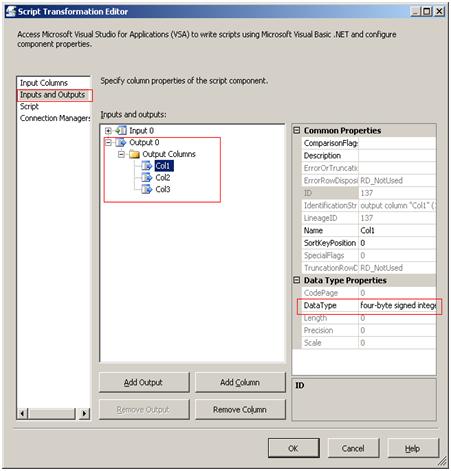
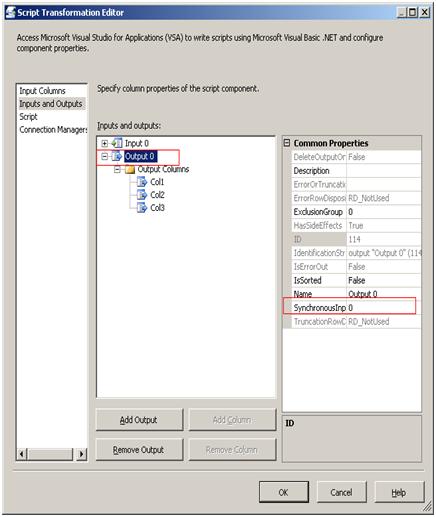
  • Go to ‘Input and Output’ tab and add three output columns (col1, col2 & col3) to the existing output ‘Output 0’. Select ‘four byte signed integer’ as their data type.
4


  • Modify the ‘SyncronizeInputId’ of Output0 to 0. This is to make the script component asyncronized.
5


  • Go to ‘Script’ tab and click on ‘Script Designer..’ to edit the script (VB.Net).
  • Select ‘Pre Compile’ as False.
  • Write the following script in the ‘Input0_ProcessInputRow’ event handler:
         Dim values() As String
        values = Row.A.Split(“#”.ToCharArray)
         Output0Buffer.AddRow()
        Output0Buffer.Col1 = Convert.ToInt32(values(0))
        Output0Buffer.Col2 = Convert.ToInt32(values(1))
        Output0Buffer.Col3 = Convert.ToInt32(values(2)) 
  • Close this and Click Ok.
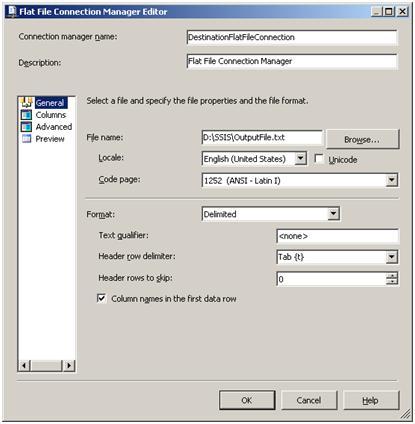
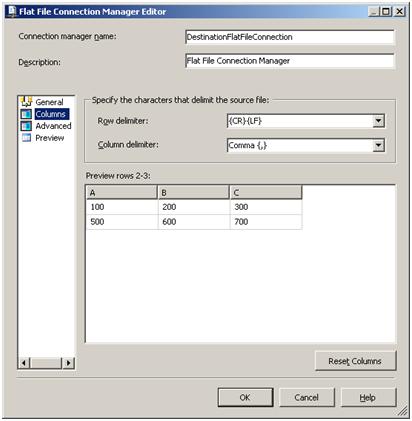
  1. Take one Flat File Destination and with the following shown setting configure its connection manager (DestinationFlatFileConnection).
6


7


  • Go to Advanced tab and modify the name of the columns from col1, col2 & col3 to A, B & C.
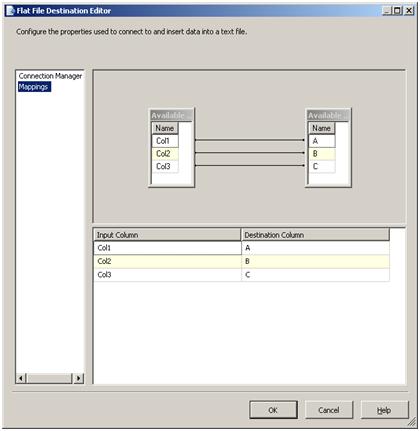
  • Go to the ‘Mappings’ tab of the flat File Destination and do the below shown column mappings:
8


Now execute the package to have the following output in the ‘OutputFile.txt’ file.
 A,B,C
100,200,300
500,600,700

“OnError” versus “OnTaskFailed” Event Handler in SSIS

There are lots of event/event handlers which we can make use of during the package execution. Among all those events/event handlers, two of them are very important for logging the custom errors; which may occur due to failure of some of the tasks of a package.

We may be required to log such errors once upon the failure of the complete package or we may want it for each & every task failed during the package execution.
So depending upon these requirements we have two types of event handlers in SSIS:
1.      OnError
2.      OnTaskFailed

OnError: This event is raised when an executable gets some errors due to any reason. This may be due to failure of any of the tasks included in the package.

OnTaskFailed: This event is raised when a task is failed irrespective of the complete package failure.

The important difference between these two is explained below:

Let’s suppose we have a package (Package 1) which has many tasks; one of them is ExecutePackage task. Now this ExecutePackage task executes another package (Package 2) which in turn contains some tasks.

Pacakge 1:  Data Flow Task -> Script Task -> ExecutePacakge Task (Package 2)
Package 2:   Script Task

Now suppose Script task of the package 2 gets failed due to some errors (like with some wrong code inside). Then OnError Event of the package 1 will be raised only once.
But OnTaskFailed event of the package 1 will be raised twice; once due to the failure of Script Task of the package 2 and second time due to the failure of the ExecutePackage task of the package 1 (which gets failed due to failure of package 2).

Observations:
  1. OnError event is raised when ever there are some errors occurring in any task of the package. These errors may be more than one for a single executable/component like in case of DFT components. And thus OnError event will be raised multiple times, but as explained in the example we took Script Task which is raising only one error.
  2. OnTaskFailed event is raised when a task is completely failed. And this will be raised for each & every task involved in that package/parent task.This can be checked by putting a Script Task in the OnTaskFailed event handler of “package 2” with displaying the Source of the failure by using a System variable “SourceName”.

How to remove duplicate records from Flat File Source (SSIS)

How to remove duplicate records from Flat File Source (SSIS)


Problem:

Since populating the data warehouse or any other database may involve various disparate source-types like SQL Server, Excel spreadsheets, DB2 etc. It can also be a Flat File/CSV file source as well. 

In case of data sources like SQL Server, Oracle wherein we generally get the data by querying the tables, views etc, we can actually put the logic to remove the duplicate probably by selecting the DISTINCT values or so. But in case of a Flat File data source we don’t have much control in terms of querying the data from it and still we want the duplicate records to be removed before loading them into the target database/file.

 Solution:

Let’s take an example where we have a flat file with four columns (A,B,C,D) and some records (100,200,300,400 etc) as shown below:

 Source File


And now say we want all of the columns to be loading into the target database, but with duplicate records (lines) removed.

Approach:


Steps:

1. Configure the Flat File Source as we required by selecting the file, delimiters (columns & header) etc.

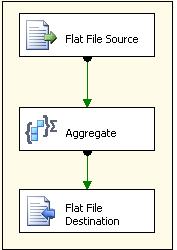
2. Now drag ‘Aggregate’ transformation following Flat File Source and configure it to have ‘Group By’ on the deciding columns/fields for the record to be unique.


3. Configure destination by mapping the columns from Aggregate transformation to the target database/file.

Run the package, and you will see no duplicate record inserted into the target database/file.

Dest File

Importing Poorly Formatted Text Files using SSIS

Introduction
Handling text files from SQL Server Integration Service (SSIS) is not new and I am not going to discuss about importing well formatted text files. There are many occasions when database developers must import text files which are not properly formatted. I will discuss three methods of doing this. For these situations we are going to use Script Component data flow task.
Knowledge-wise you need to have basic understanding of SSIS packages. If you have created SSIS package to import traditional text files that will be more than enough. We are going to do some .NET scripting, you need to have some understanding of .NET coding.
Resource-wise you need to have SQL Server Business Intelligence Development Studio installed in your computer.
Case 1: Importing Text files with different row delimiters in different rows
I am sure that you have imported text files. The text files normally have several columns which are separated by either comma (,), semi colon (;) or colon (:) etc. However, what would happen when there are different column delimiters. For example what if you have data in a text file like the following.
P0001,Product 1P0002,Product 2
P0003,Product 3
P0004;Product 4
P0005,Product 5
P0006,Product 6
P0007;Product 7
P0008,Product 8
P0009;Product 9
P00010,Product 10
You can see that above two columns are separated either by comma or semi-colon. Let us see how can we create a package to import this data. I will explain how to write the first package in detail.
After creating a package project and new package in the project, create a connection manager named Text File. In the General section of the connection manager, you need to give the path for the text file.
Next you need to select columns options. Select row delimiter as {CR}{LF}.
 After selecting the row delimiter, you need to set the column delimiter to something other than {CR}{LF}. Otherwise it won't allow you to confirm this dialogue. However, this does not really matter as this option will be disabled later. After doing this you can see that entire record of the text file as shown in one column.
 Next select advanced section. In that you have to give enough length to OutputColumnWidth. In this case it is 250.
Then drag and drop a data flow task to control flow. Inside the added data flow, drag and drop Flat File Source. As you have only one text file connection manager by default - Text File will be attached to this Flat File Source. If not you have to assign correct text file connection from the connection option of the flat file source.
 Next is adding most import component – the script component. Just drag and drop a script task to the data flow area. Just after dragging the script component you will get the following screen.
 
It is obvious that we are going to do a Transformation which is the last option. I will discuss about other two options in a separate article.
Next task is to configure the Script component. We have three options to configure - Input Columns, Input and Outputs and Script. If you select Input option you see the following screen. In this screen you can leave the Output Alias as it is Column 0 by default. But for the completeness I have changed this to Line.
Next option is , Inputs and Outputs. Here we have to define the input and output column properties.
As you can see on the input columns tree node, there is only one element which is Line. Line was defined in the Input Columns.

Next select Output Columns and add two columns , code and description by clicking the Add Column button. Allocate the correct data type and length for each column. In this case I have selected string [DT_STR] as data type and 50 as the data length.  
An important configuration of the script component is Script option. Select the Script option and click the Design Script button. You will be taken to the Microsoft Visual Studio to add necessary .NET code.
Public Overrides Sub Input0_ProcessInputRow(ByVal Row As Input0Buffer)
Dim strRow As String
Dim
strColSeperator As String
Dim
rowValues As String()
strRow = Row.Line.ToString()
If
strRow.Contains(",") Then
strColSeperator = (",")
ElseIf
strRow.Contains(";") Then
strColSeperator = ";"
End
If
rowValues = Row.Line.Split(CChar(strColSeperator))
Row.Code = rowValues.GetValue(0).ToString()
Row.Description = rowValues.GetValue(1).ToString()
 End Sub
Above is the only code you need to add. From the Contains function we will identify the column separator for the row. Then using split function and passing the correct column delimiter we can separate the two columns. 
For demonstration purposes I have added a data viewer. Above is the output of the data viewer.


You can see that data was separated despite containing different column delimiters.  
Here is what the final package looks like:


Case 2: different Column Delimiters in Same Row
In Case 1 we discussed text files which have different column separators in different columns. What if you have different column delimiters in same row. For example, consider the following data set in a text file.
P1;P0001,Product 1
P2;P0002,Product 2
P3;P0003,Product 3
P4;P0004,Product 4
P5;P0005,Product 5
P6;P0006,Product 6
P7;P0007,Product 7
P8;P0008,Product 8
P9;P0009,Product 9
P10;P00010,Product 10
 
The first two columns are separated by semi colon while the other two columns are separated by a comma. There is a similar situation with Case 1 – the only difference is the script component.
You will need to add a another column to the output columns, namely Sh_code.
Public Overrides Sub Input0_ProcessInputRow(ByVal Row As Input0Buffer)
Dim strRow As String
Dim
strColSeperator As String
Dim
rowValues1 As String()
Dim rowValues2 As String()
 
rowValues1 = Row.Line.Split(CChar(";"))
Row.ShCode = rowValues1.GetValue(0).ToString()
rowValues2 = rowValues1.GetValue(1).ToString().Split(CChar(","))
Row.Code = rowValues2.GetValue(0).ToString()
Row.Description = rowValues2.GetValue(1).ToString()
 
End Sub 
This time we have used two split functions to seperate the data. The final output will appear as below:


Case 3: Variable Columns
In the previous cases we have the same number of columns throughout. What if the number of columns also varied? For example, consider the following text file:
P1,P0001,Product 1
P2,P0002,Product 2,01/10/2007
P3,P0003,Product 3
P4,P0004,Product 4
P5,P0005,Product 5
P6,P0006,Product 6,21/06/2007
P7,P0007,Product 7
P8,P0008,Product 8,15/10/2008
P9,P0009,Product 9
P10,P00010,Product 10
You can see that the date is available for only few columns. You will not be able to use traditional text file handling with SSIS for above case.
Again, the difference with the previous two cases is the script component. To start with you will need to add new output column named Date. Then we need to add some .NET code for the script component:
Public Overrides Sub Input0_ProcessInputRow(ByVal Row As Input0Buffer)
Dim strRow As String
Dim
strColSeperator As String
Dim
rowValues As String()
rowValues = Row.Line.Split(CChar(","))
Row.ShCode = rowValues.GetValue(0).ToString()
Row.Code = rowValues.GetValue(1).ToString()
Row.Description = rowValues.GetValue(2).ToString()
If rowValues.GetUpperBound(0) = 3 ThenRow.Date = rowValues.GetValue(3).ToString()
End If
 
End Sub
End Class 
In this case aftr splitting, the script checks the number of elements the array has. If it 3 then you have a date column in the data row. Again we will check the data viewer output:


Sample
For your reference I have added sample SSIS package for you along with the text files I have used. Download here

Case
Package
Text File
Case 1
MultipleRowDelDifferentRows.dtsx
MultipleRowDelDifferentRows.txt
Case 2
MultipleRowDelSameRows.dtsx
MultipleRowDelSameRows.txt
Case 3
MultipleNumberofColums.dtsx
MultipleNumberofColums.txt
You may need to change all the connection manager file paths to suit to your file path.


Monday 9 May 2011

Foreach Loop based on Variable - SSIS

There are lots of times that you need to set your own enumerator in foreach loop container.
For example you want to select special sub directories based on specified conditions and then you want to loop through them. so you need to make your own enumerator. so it's better to create a variable which contains array of these values and then just loop in the items of this variable.
You know there are few types of enumerators that you can use in foreach loop,
If you want to make your own enumerator based on Variable, you must choose Foreach From Variable Enumerator .


Let me simplify this type of enumerator by an example:
1- Create two variables:
Name                     DataType
Collection               object
Item                      object


2- add a Script Task, set User::Collection as ReadWriteVariables


3- choose language as Visual C#, and write this code in main() method:
public void Main()
        {
            System.Collections.ArrayList arr = new System.Collections.ArrayList();
            arr.Add("the first item");
            arr.Add("the second item");
            arr.Add("the third item");
            Dts.Variables["User::Collection"].Value = arr;

            Dts.TaskResult = (int)ScriptResults.Success;
        }
4- save and build the Script.
5- add a Foreach Loop container, set enumerator as Foreach From Variable Enumerator.
6- in enumerator configuration , select variable User::Collection .

7- in variable mapping tab, set variable User::Item with index 0 .

8- add another Script Task inside the foreach loop container,
9- set language as Visual C#, set ReadOnlyVariable as User::Item .


10- write this script in main() method, and then save and build script:
public void Main()
        {
            MessageBox.Show(Dts.Variables["User::Item"].Value.ToString());

            Dts.TaskResult = (int)ScriptResults.Success;
        }
11- Run the package.

After running the package , you will see message box three times, each times with on statement.
That's All.

Looping through specific files - SSIS


As you may know, there is an enuerator in Foreach Loop Container which help you to loop through files, named File Foreach Enumerator. you can specify a location for searching through files and get files as enuerator in loop.
But, there are some times which you need to loop through specific files not all of files in the directory.
you can use MASK in file names and then just loop through match files. I want to talk about another common real world problem now.

Suppose you have a table which has file names inside, and you have a directory of physical files. now you want to loop through files in directory and check if the file is in table do task1 else do task2.

let's go on sample, through this sample you will find how to implement foreach loop container for file enumerator and use execute sql task with precedence constraint.


First of all our table structure in database is:
CREATE TABLE [dbo].[RawFiles](
    [ID] [bigint] IDENTITY(1,1) NOT NULL,
    [DateTime] [datetime] NOT NULL,
    [FileName] [nvarchar](max) NULL,
    [SourceFileBin] [varbinary](max) NULL,
    [FileType] [int] NULL,
    [Switch] [bigint] NULL,

 CONSTRAINT [PK_RawFiles] PRIMARY KEY CLUSTERED
(
    [ID] ASC
)WITH (PAD_INDEX  = OFF, STATISTICS_NORECOMPUTE  = OFF, IGNORE_DUP_KEY = OFF, ALLOW_ROW_LOCKS  = ON, ALLOW_PAGE_LOCKS  = ON) ON [PRIMARY]
) ON [PRIMARY]


the [FileName] column has exact file name values inside.

now create a SSIS package,
Add two package scope variables:
FileName    datatype: string
Status        datatype: Int32
Add a Foreach Loop Container
double click on foreach container and Foreach Loop Editor window will open,
go to Collection tab, set Enumerator as Foreach File Enumerator
in Enumerator configuration, set Folder to the folder your physical files exists there.
in the Retrieve file name section select NAME ONLY , because we have only file names in table we want to lookup.


go to Variable Mappings tab,
select User::FileName in variable column, and set Index column as 0.


now Foreach loop container setting is finished, this will loop through files in the specified folder and in each iteration fills the FileName variable.

Add an Execute SQL Task inside the Foreach Loop container,
double click on it to open Execute SQL Task Editor,
connect it to your database with an OLE DB Connection Manager,
set ResultSet property to Single Row.
set SQLStatement as :

select count(*) as cnt from RawFiles where FileName=?


question mark in this statement means parameter,

now go to Parameter Mapping tab,
Add a line there,
set Variable Name as User::FileName ,
set Data Type as Nvarchar and parameter size as 500 , this is because filename field in table has Nvarchar data type,
set Parameter Name as 0 ,
Note that when you use OLE DB Connection managers, then you should name your parameters with 0,1,2,3 ...


this will fill the question mark parameter with the value from FileName variable.

now go to Result Set tab,
Add a line there,
set Result Name as cnt ,
set Variable Name as User::Status ,


this will fill the Status variable with result of query above, that means if there was a record with this filename in table then Status will be 1 or more, else will be 0 .

now , filling status made complete, the only step remains is that you should check value of Status and send it to appropriate task. suppose you want to do this:
status>0  -> message box which shows "exists!"
status<=0  -> message box which shows "NOT exists!"

so, Add two Script tasks after Execute sql task inside the foreach loop,
connect green arrow from execute sql task to these script task,
for the first script task, right click on green arrow, select Edit
Precedence Constraint Editor will open,
set Evaluationi Operation as EXPRESSION,
type this expression in EXPRESSION text box:
@Status>0


do same thing for another script task and set expression there as @Status<=0

write a MessageBox.Show("exists") in first script task, and MessageBox.Show("NOT exists") in second script task.

All done, just run the package.
this is whole schema:


Fine.

SSIS - Sql Server to XML - Save to file

As you know there is no XML destination in SSIS.
so how you can save result of a query from sql server to XML file?
Solution is:


First Of all you can use FOR XML to get result of query in XML , look at our sample query :

SELECT EmployeeID,NationalIDNumber,ContactID
FROM HumanResources.Employee
FOR XML RAW('Facility'),Root('Extract'),Elements  
 
this will creates elements with name 'Facility', and attributes 'EmployeeID' , 'NationalIDNumber' , 'ContactID'
and the Root node is 'Extract'.
for more information about FOR XML in sql server look here .
So, start with SSIS:

1- Create a Variable of String type in package scope, and name it as XMLData. 

2- Add an Execute SQL Task, set connection as OLEDB to the AdventureWorks Database ( If you haven't AdventureWorks sample database, download it from here ),
write this query in SqlStatement:
SELECT EmployeeID,NationalIDNumber,ContactID
FROM HumanResources.Employee
FOR XML RAW('Facility'),Root('Extract'),Elements  


Set ResultSet property to XML.
then go to Result Set tab, and do this mapping:
Result Name                         Variable Name
--------------------------------------------
 0                                      User::XMLData

3- Add a Script Task after execute sql task, set language as C#. and set ReadOnlyVariables as User::XMLData .


then edit script and write this code in Main() method:
public void Main()
        {
            System.Xml.XmlDocument xdoc = new System.Xml.XmlDocument();
            xdoc.InnerXml = Dts.Variables["XMLData"].Value.ToString();
            xdoc.Save(@"E:\Output.xml");

            Dts.TaskResult = (int)ScriptResults.Success;
        }
 whole schema:

Finished !
now just run the package and result of query will save in xml file specified.